

Restoration in the stairwell for Skövdebostäder
- Sanna Wieslander

- Jul 16, 2025
- 3 min read
Something I've done a lot since I started working as a decorative painter (which I don't usually post pictures of for some reason) is repairing existing paintings that have been damaged over the years.
To restore the painting I first have to clean and repair damaged surfaces to get the same surface layer as the surrounding area. Then study how the painting was created, what technique and what brushes/tools were used, what kind of base paint it should be and how the different layers were built up. Then of course mix exactly the right color in the same medium and gloss that was used previously. It's a lot of research! All to imitate the original paintings as much as possible. Yes, it shouldn't really be visible that you've done anything when it's finished. As if it's exactly the way it's always been (but without damages).
It's not always the easiest thing to paint exactly as someone else has done before, but it's so incredibly satisfying when you manage to restore the surface so that it's not visible that there has been any damage there before. I thought it might be fun to share a bit of that process with you. This week I've been working with exactly that. This time for Skövdebostäder where I repaired some damages in a beautiful old stairwell.

This is what the damage looked like when I got there. Probably painted over some kind of renovation wallpaper where a piece has been torn down, which also created some level differences on the surface.

Same damage here. I cut down loose wallpaper around the damaged area and then primed that area.

After priming, I applied putty, sanded in between, and then applied another layer of putty.

When it comes to more modern painting and finding the right wall color, I usually use a digital color reader that reads the NCS code (or the closest one) of the existing color on the wall. Then I compare the colors in my color pen with how it looks on the wall surface, choose a color that I think is most similar (or several) and go to the paint store and buy some wall color in that NCS code and test paint it. This time, my color reader couldn't find the exact right shade, unfortunately, so I had to mix some of my own colors by hand (but it was still pretty close so I could use the sample cans as a base and then add some black, yellow, red, etc.)

A picture from that process. I used the cut-off pieces to compare the colors I mixed until I got it exactly right.

The happiness when you mix exactly the right shade for the base color that cannot be found in the NCS system.
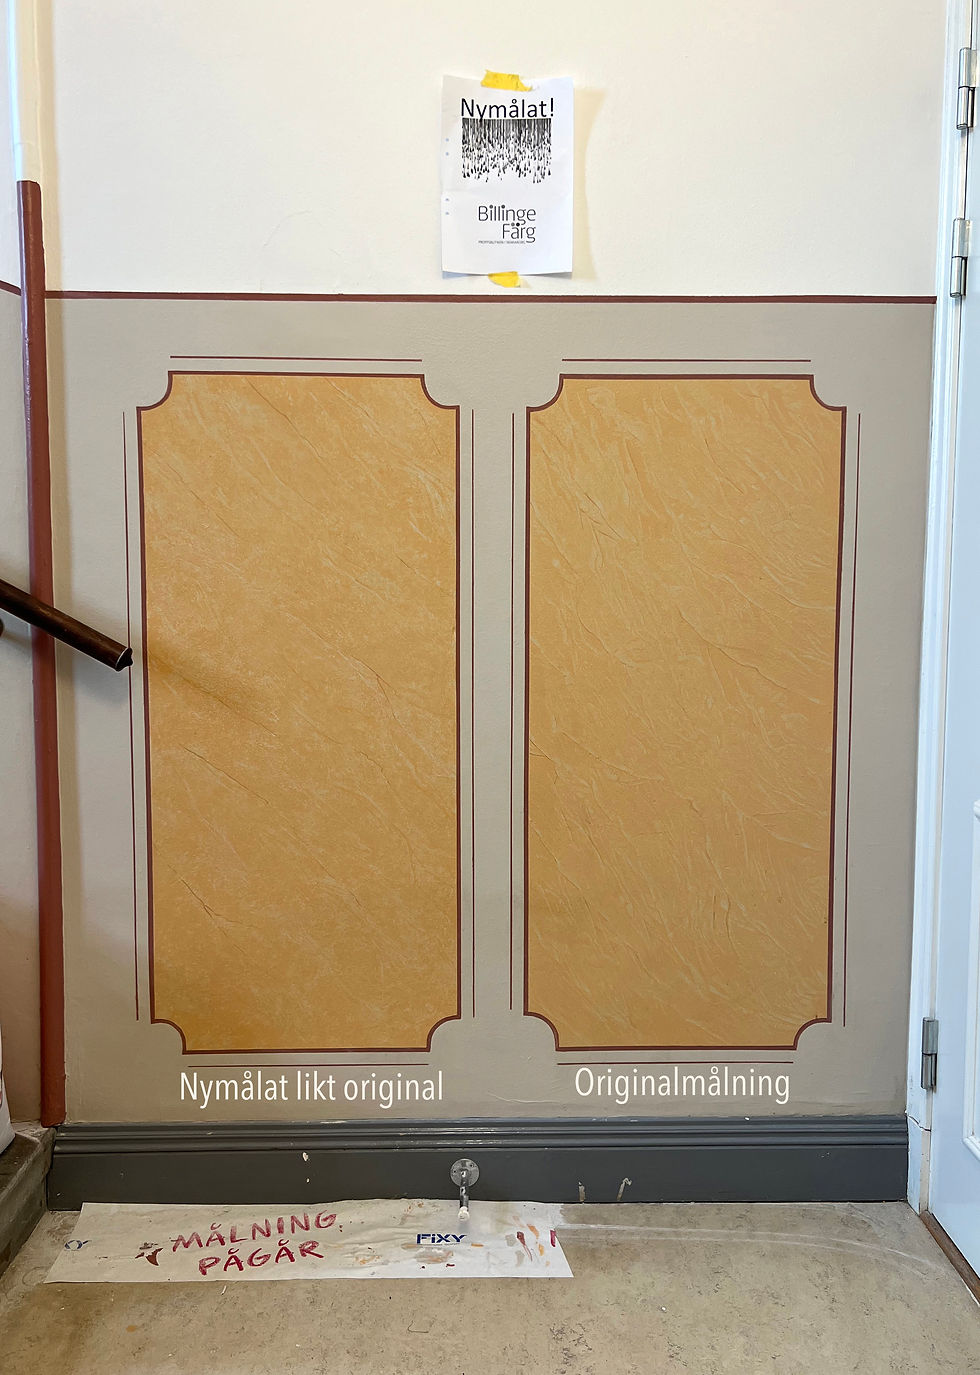
When it came to the glazing, I didn't have time to take many pictures of the process as I was glazing with regular wall paint which dries super fast. So I had to be quick with the cloth to lift the paint and get that flamed and streaky effect. Here I chose to repaint the entire left mirror (The right one is the original painting).


Here I have only painted the damaged surface. That is, the lower corners of the mirrors and the gray surface in between are painted by me, while the remaining surfaces around are the original painting. You can't see that there's been a big hole there before, right? :) Thank you Skövdebostäder for the trust!


Comments